Course element "Entry Control"
Profile
| Name | Zutrittskontrolle |
|---|---|
| Icon |  |
| Availability | OLAT 6.7.0 |
| Functional group | Administration and Organization |
| Purpose | Conducting and documenting of access control |
| Assessable | No |
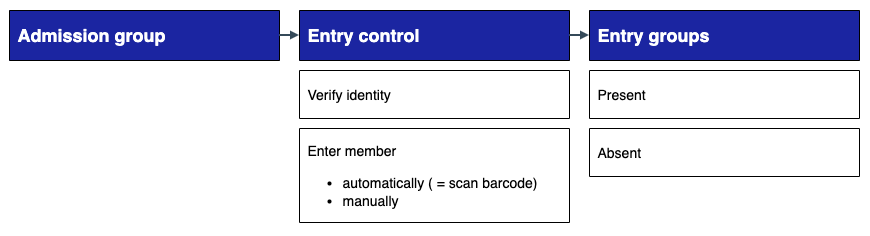
The course element "Entry control" allows you to manage present and absent participants in on-site settings such as exams, workshops, and exclusive events.

Using a smartphone or webcam, the barcode from the UZH now app or the UZH Card is scanned. The result is compared with members of previously defined admission group(s).
After successful verification, the person is automatically added to the entry group "- present". If the scan is not successful, the person can be added manually. After completing the entry control, all participants who were not scanned or manually entered are assigned to the entry group "- absent".
These groups can be used to selectively release course content.
Quick start guide
Role: Owner, Coach
- Prepare course element
- Insert and configure the element in the course editor
- Create a new admission group or add an existing one
- If necessary: Define and assign scanning personnel
- Edit admission group
- Add members
- Perform entry control
- Scan barcode from UZH Card / UZH now app
- Confirm scan (optional: skip identity check if simplified mode is active)
- Complete entry control
- View entry groups
- After completion, members of the admission groups are split into "- present" and "– absent".
Course editor
Role: Owner
Information on configuring the general tabs "Title and description", "Layout", "Visibility" and "Access" (or "Learning path" in learning path courses) can be found in the chapter "Configuration tabs of course elements".
Configuration
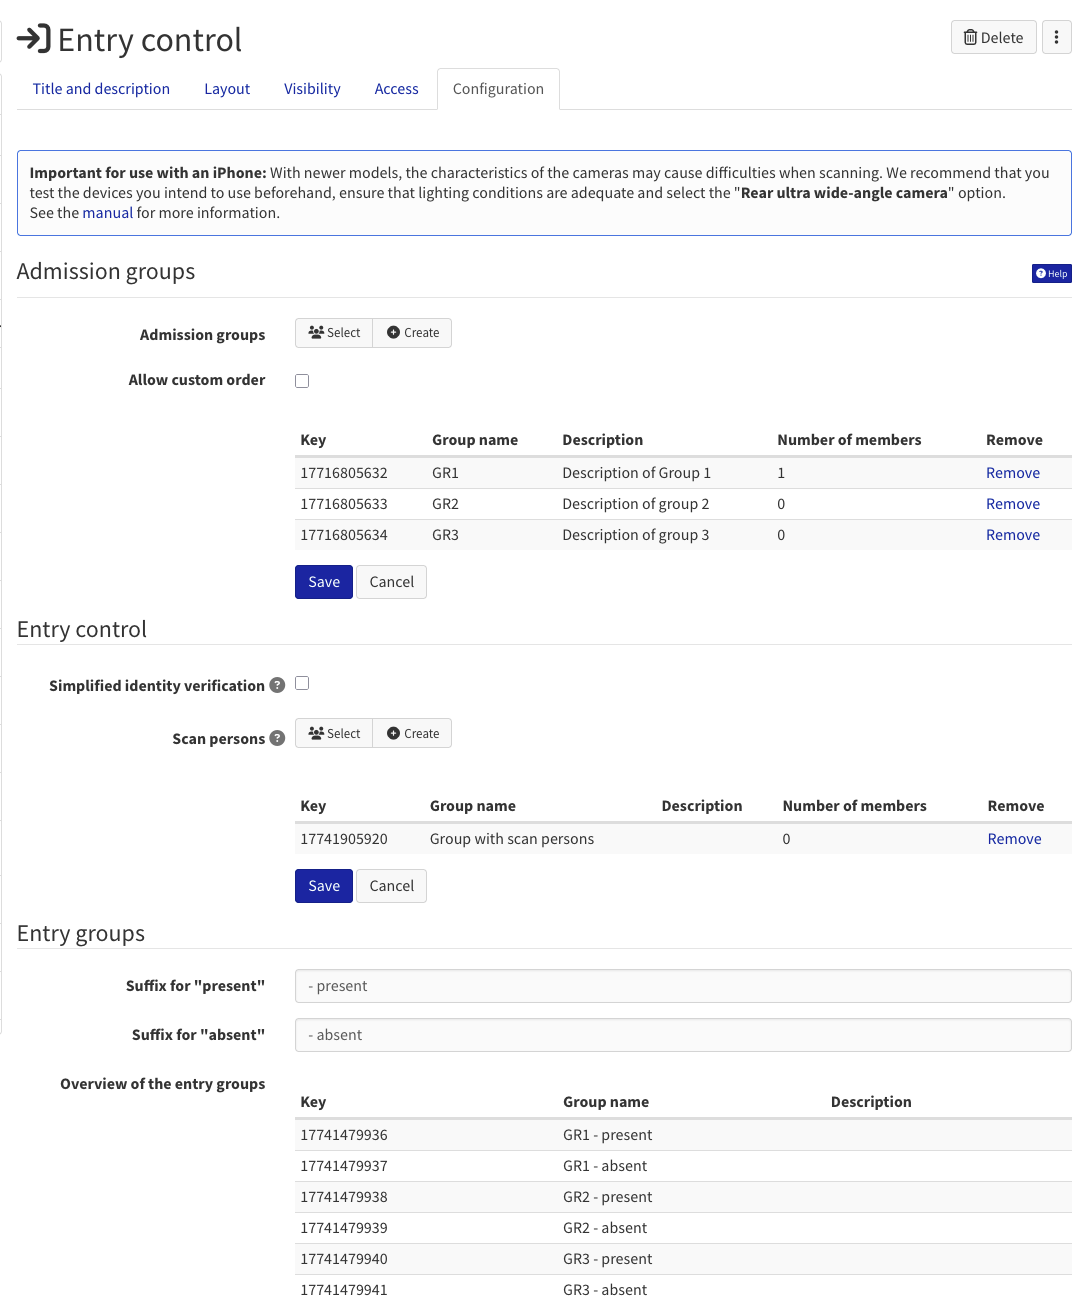
Admission groups
Every entry control requires at least one admission group. This is a group whose members are allowed to participate in an event.
Course owners can select existing OLAT groups or create new groups. The order can be adjusted afterwards.
Removing a group from the entry control element does not delete it from the course.
Entry control settings
Simplified identity check
The simplified identity check allows for faster scanning by skipping the display of detailed information such as the email address and admission group. In addition, entry does not need to be explicitly confirmed for each individual scan.
Scanning personnel
You can create or select one or more groups of scanning personnel. These users do not have access to course content or to course administration functions (such as member management or the assessment tool). Their permissions are limited exclusively to carrying out the entry control process.
Course owners and coaches can perform entry control even without being assigned to the scanning personnel group(s).
Entry groups
For each admission group, two entry groups are created automatically:
- one for participants who are present (suffix: "- present")
- one for participants who are absent (suffix: "- absent")
The suffixes are fixed and cannot be changed. The first part of each group name corresponds to the name of the respective admission group.
Course run
Role: Owner, coach
In the course run, course owners and coaches can add members to the admission groups, carry out the entry control process, and review the members of the entry groups.
All tables and their data can be exported as Excel files.
Admission groups
The admission groups defined in the course editor, along with their members, are listed in the "Admission groups" tab.
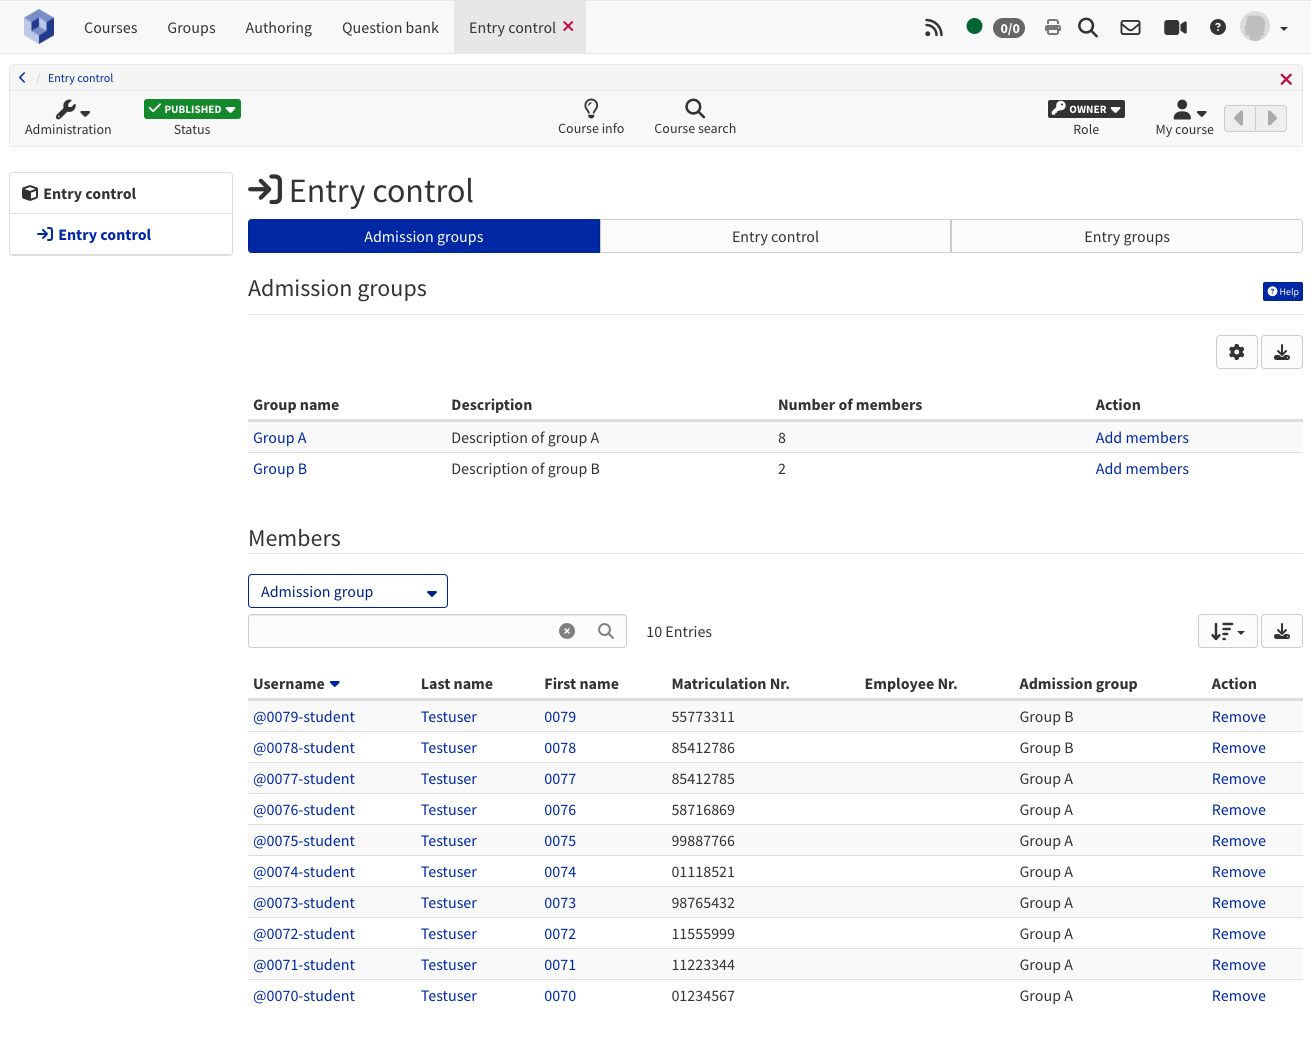
Members can be added in the "Admission groups" section either via the user search or the bulk search. If necessary, individual members can be removed in the "Members" section.
Important notes: * A member can belong to only one admission group. If a member is added to more than one admission group, a corresponding error message will appear.
-
In principle, it is possible to manage admission and entry groups via the course’s member management. However, this is not recommended, as it makes it harder to track changes.
-
When adding a member, you can choose whether the person should be assigned the role of participant or coach. For students, it is generally recommended to assign the role "participant", especially if the group is also used in other course elements.
Entry control
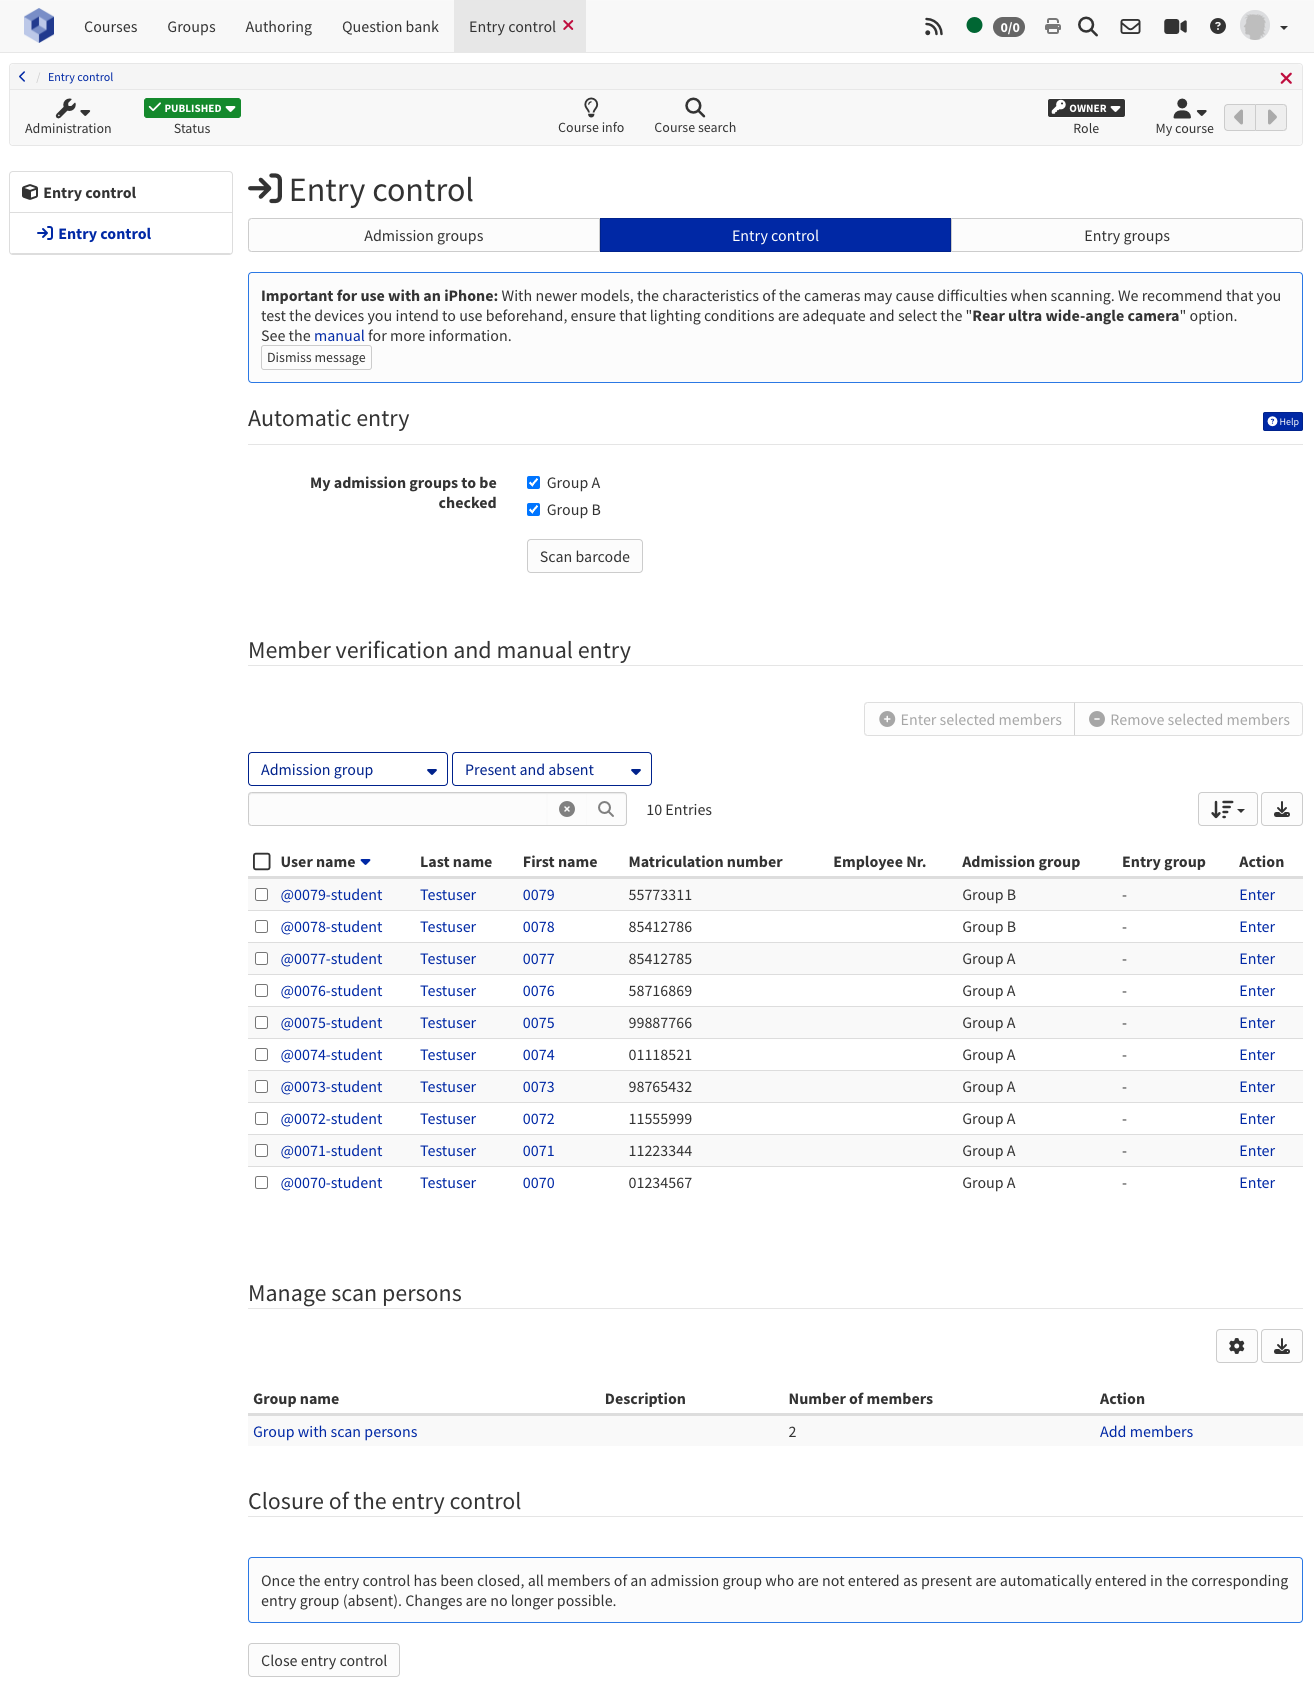
The actual entry control process is carried out in the "Entry control" tab.
Automatic assignment
Entry control can be performed simultaneously by multiple people. With the option "My admission groups to check", the member list can be filtered so that each person is responsible only for their assigned group. This option is useful if members need to be checked by a specific scanning person (e.g. in the case of room assignments).
To automatically record members, log in to OLAT on a smartphone or tablet and select the "Scan barcode" button in the "Entry control" tab.
Camera access must be enabled in the browser. To do so, select "Request camera permission" and follow the instructions of your browser or mobile device.

You can then begin scanning the barcodes displayed in the UZH now app or on the UZH Card.
Scan results
-
Access granted (blue)
- Notification: "Scan successful ..."

- The scan was successful, and entry can be confirmed after checking the displayed data.
- If a person has multiple OLAT accounts, an additional notice will appear indicating that the person must log in with the correct OLAT account (if a login is required during the event).
- Notification: "Scan successful ..."
-
Entry not possible (yellow)
- Notification: "The member with barcode ... has already been added"

- The member has already been assigned to an entry group. .
- Notification: "The member with barcode ... has already been added"
-
Entry not possible (red)
- Warning 1: "No user with barcode "12345678" was found.

- The scanned barcode does not match any matriculation or personnel number stored in OLAT.
- Warnung 2: "The user cannot be entered in any entry group because they are not entered in any admission group."

- The scanned barcode matches a matriculation or personnel number of an OLAT account, but the person is not a member of the admission group currently being checked.
- Warning 1: "No user with barcode "12345678" was found.
Scan results with simplified identity check
- Successful scan: A green message appears for 2 seconds. After that, the next barcode can be scanned.
- Unsuccessful scan: A red message appears with information about the error. This message remains visible until the next scan.
Note on the UZH barcode
In the UZH now app or on the back of the UZH Card, the matriculation number or personnel number is encoded as a barcode. The course element "Entry control" can process both types of numbers. If a member has a matriculation number, this will be used. If no matriculation number is available, the personnel number will be used for entry control instead.
Reviewing members and manual assignment
Members of the admission groups can be reviewed manually and, if necessary (for example if scanning does not work), can be assigned to or removed from entry groups manually. Every change is recorded in the change log. Click on a member’s name to open the detailed view and review the history of changes.
Managing scanning personnel
If configured in the course editor, scanning personnel can be added. Members of this group are exclusively authorised to perform entry control and do not have access to any other course functions.
As with admission groups, it is recommended to assign scanning personnel only participant permissions.
Completing the entry control
Course owners and coaches can complete the entry control process. All members who have not yet been assigned to an entry group will automatically be added to the "– absent" group.
After completion, no further changes are possible. If required, the entry control process can be reopened.
Entry groups
The results of the entry control can be viewed in the "Entry groups" tab.
Here you can check how many members have been assigned to each entry group. The entry groups can also be used in other course elements to control access.
Participant view
Role: Participant
If the course element is visible to you, it serves an informational purpose only. You can check which admission group or entry group you have been assigned to. If the admission group includes a description, this will also be visible to you.

Practical recommendations
Technical requirements
Internet connection
A functioning and stable internet connection is required in order to use the course element "Entry control".
Scanning devices
Scanning is carried out in OLAT via a web browser on a mobile device, using the device’s camera. Since different devices and cameras may be used, variations in performance and behaviour can occur. It is therefore recommended to perform a test run prior to the event.
- Android and iOS (iPad): generally work without issues
- iOS (iPhone): some limitations may occur
General scanning tips
- Use portrait orientation. Depending on the device, automatic screen rotation can be disabled.
- Ensure good lighting conditions.
- If the device returns to the OLAT course overview during scanning, reopen the course and navigate back to the "Entry control" course element. Previously recorded data will remain saved.
Notes for iOS users
- Camera access must be explicitly granted the first time a scan is performed. It is recommended to allow persistent access so that the permission dialog does not appear before each scan.
- iPhones often have multiple rear-facing cameras. The dual wide-angle camera generally provides the best results. To change the camera in the scanning dialog, the scanning process must first be stopped. A different camera can then be selected.
- If focusing issues occur, reloading the page (thereby restarting the camera) can help.
- Optimal scanning mode: hold the smartphone upright and ensure sufficient lighting.
Organization and time planning
Each scan takes approximately 12 seconds (including identity verification and barcode scanning). Based on this estimate, plan the required time and the number of scanning personnel accordingly.
There are two common organisational approaches:
- Combined workflow: One or more supervisors check the identity of participants and directly scan the barcode themselves.
- Separated workflow: For larger groups, one or more supervisors first verify participants’ identities, while other supervisors are responsible for scanning the barcodes.
Permissions by role
| Owner | Coach | Scanning personnel | |
|---|---|---|---|
| Course editor | x | ||
| Members management | x | ||
| Assessment tool | x | x | |
| CE Entry control: | |||
| Admission groups tab | x | x1 | |
| Entry control tab: | |||
| Manually verify and register participants | x | x1 | |
| Complete entry control | x | x1 | |
| Scan barcodes | x | x1 | x |
| Entry groups tab | x | x1 |
1 If not all course coaches should be allowed to manually manage members of the entry groups or complete the entry control process, create a separate group containing only the authorised coaches and scanning personnel. Configure the course element "Entry control" so that it is visible and usable exclusively for this group.
Use cases
On-site exam
Objective: For an online exam conducted on site, you want to ensure that only those students who are physically present can take the exam (i.e. students should not be able to participate from home).
Procedure:
-
Add the course element "Entry control" to your OLAT course.
-
Set up the admission groups and add all members who are eligible to take the exam.
-
Configure your exam course element(s) so that they are visible and accessible only to the entry group "- present".
-
Before the exam starts, check and scan the students’ UZH now app or their UZH Card. All present participants are automatically assigned to the group "- present".
-
Only students who are listed in the "- present" group will be able to start the exam.
-
If required, export the attendance and absence data as an Excel file.
Workshop
Objective: Unter dem Semester gibt es in einer Veranstaltung einen Workshop. Sie möchten wissen, wer am Workshop dabei war.
Procedure:
-
Add the course element "Entry control" to your existing campus course and make it invisible to course participants.
-
Add the campus groups "_ UZH students with module booking" and "_ Manually added participants" as admission groups.
-
Before, during, or after the workshop, scan the students’ UZH Cards or their UZH now app.
-
If required, export the attendance and absence data as an Excel file.